
- 23 July 2023
- 142
How to Use System Restore on Windows 10 – Step-by-Step Guide

Introduction to Windows 10 System Restore:
System Restore on Windows 10 is a powerful recovery feature that allows you to create a snapshot of your computer’s current state and save it as a “restore point.” If needed for corrective purposes later on, one can employ these restore points to roll back any system modifications caused by updates, drivers ,apps or erroneous tweaks done in the Registry. If you utilize System Restore, you can effectively address serious issues without risking the loss of your important files.
How to Enable System Restore on Windows 10:
Prior to manually creating restore points or enabling automatic creation by the system, The activation of System Restore is required. Here’s how:
Open Start and search for “Make a restore point.”
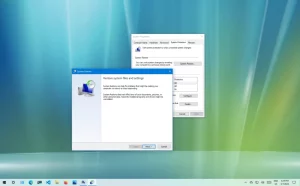
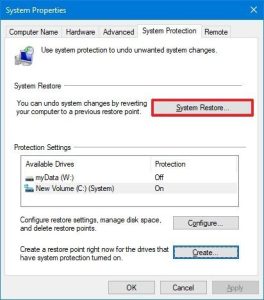
Click the top result to open the System Properties page.
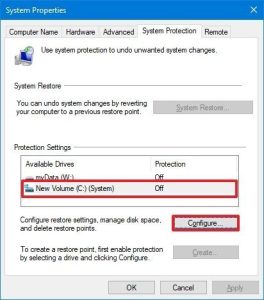
Under the “Protection Settings” section, select the primary “System” drive.
Click the Configure button.
Select the “Turn on system protection” option.
You can adjust the storage space for recovery using the slider under “Disk Space Usage” or delete all restore points if needed.
Click Apply, then OK.
In the present, Windows 10 automatically generates restore points whenever it identifies notable system alterations
How to Create a System Restore Point on Windows 10:
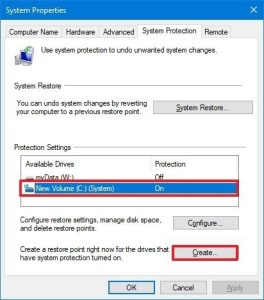
Even though System Restore creates restore points automatically, consider creating a restore point manually before initiating any system modifications. Here’s how to do it:
Open Start and search for “Creating a restore point.”
Click the top result By opening it, you can reach and explore the contents of the System Properties page.. Within the category of “Protection Settings”, find and activate by pressing on a button known as Create.
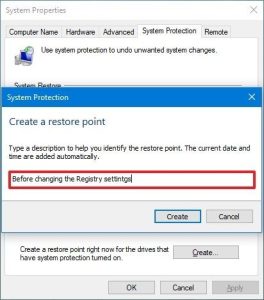
Type a descriptive name for the restore point, such as “Before modifying the Registry settings.”
Click the Create button.
Presently, you hold a manual restore point which can be employed whenever needed. to employ if the need arises.
How to Recover Using System Restore on Windows 10:
If you face any errors or difficulties after altering system settings, you have the option to utilize System Restore and go back to an earlier state. There are two ways to do this: By utilizing either your computer’s desktop interface or through accessing its advanced startup settings.
Undo System Changes from the Desktop:
Open Start and search for “Locate the setting to generate a restore point.”
Click the top result to open the System Properties page.
Click Next.
Pick the restore point you desire for recovery.
Click “Scan for affected programs” to see which apps will be removed due to the restore.
Click Close.
By utilizing System Restore, your computer can be reverted to its previous state, addressing any concerns resulting from recent changes and resolving them.
Undo System Changes from Advanced Startup:
If you can’t access the desktop, you can use the advanced startup settings for recovery:
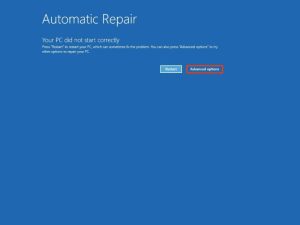
Commence the process of starting your computer and disrupt the boot sequence by repeatedly pressing the power button up to the recovery environment becomes visible.
Click Advanced options.
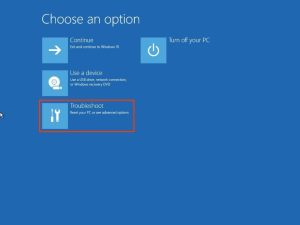
Click Troubleshoot.
Click Advanced options again.

Select System Restore.
Pick your Windows 10 account followed by confirming the password.
Click Continue.
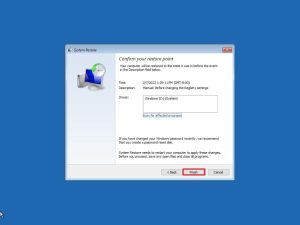
Click Next and select the restore point for recovery.
Click “Scan for affected programs” to see which apps will be removed due to the restore.
Click Close, then Next, and finally, Finish.
The application of the system restore point is about to start, Reversing all problematic alterations and enabling proper computer functioning once more.
Kindly be aware that relying on System Restore for backup purposes is not advisable Also, refrain from using System Restore in order to reset your computer back to its original factory state. With the aim of rapidly restoring your system from configuration issues while keeping your files intact.
In conclusion,
Having System Restore at your disposal is extremely advantageous to address Windows 10 problems resulting from recent alterations to the system Through activation and the establishment of manual restore points whenever required, you can guarantee a smoother and more secure computer usage.